


I rely on disciplined position sizing to protect my trading account from catastrophic drawdowns. The 2% rule—risking no more than 2% of account equity on any one trade—has become a cornerstone of my risk management plan because it caps single-trade exposure while keeping trades meaningful.
In this guide I walk through the math, practical adjustments for volatility, common implementation mistakes I’ve seen, and step-by-step actions you can take to put the rule to work immediately.

Quick summary
- Risk no more than 2% of your account equity per trade to limit single-trade losses.
- Calculate position size as (Account Equity × Risk%) ÷ (Stop-loss distance in currency per share/contract).
- Adjust size for volatility using ATR or percent-based stop placement.
- Combine the 2% rule with risk-per-day and maximum-concurrent-risk limits for better drawdown control.
- Use a simple position-sizing calculator or spreadsheet to automate the math and remove emotion.
What the 2% Rule Is and Why It Works
The 2% rule means you risk at most 2% of your current account equity on any single trade. “Risk” is the difference between your entry and your stop loss, multiplied by position size.
This rule works because it preserves capital after a string of losses. For example, even with 10 consecutive 2% losses you still have roughly 81.7% of your starting equity, which keeps you in the game to recover with positive edge trades.
Position Size Calculation: The Formula
Use this straightforward formula to compute position size in shares, contracts, or lots:
- Position size = (Account Equity × Risk %) ÷ Risk per share
Where Risk per share = Entry price − Stop-loss price (for long positions). For short positions, Risk per share = Stop-loss price − Entry price.
Worked Example
Suppose your account equity is $50,000 and you choose 2% risk per trade. Your dollar risk is $1,000 (50,000 × 0.02).
If you enter a stock at $25 and set a stop at $23, your risk per share is $2. Position size = $1,000 ÷ $2 = 500 shares.
That means if the stop is hit, you lose $1,000, which is 2% of the account.
Adjusting for Volatility and Instrument Type
Flat percentage stops are simple but can punish you in high-volatility names. I use volatility-adjusted stops—commonly ATR (Average True Range)—to set a stop that’s less likely to be noise.
Example: If ATR(14) = $1.50 and I set a 1.5×ATR stop, my stop distance = $2.25. Using the same $1,000 risk, position size = $1,000 ÷ $2.25 ≈ 444 shares.
Position Size Comparison
| Fixed-dollar / Fixed-lot | 2% Rule (Percent-based) |
|---|---|
| Same number of shares/contracts each trade regardless of stop distance; can produce outsized risk when stops are wide. | Sizes change to keep the dollar risk constant; accounts for stop distance and reduces chance of large single-trade losses. |
| May be easier to implement for beginners with simple setups. | Requires calculation or a calculator but provides consistent risk control across different trades. |
Practical Implementation Steps
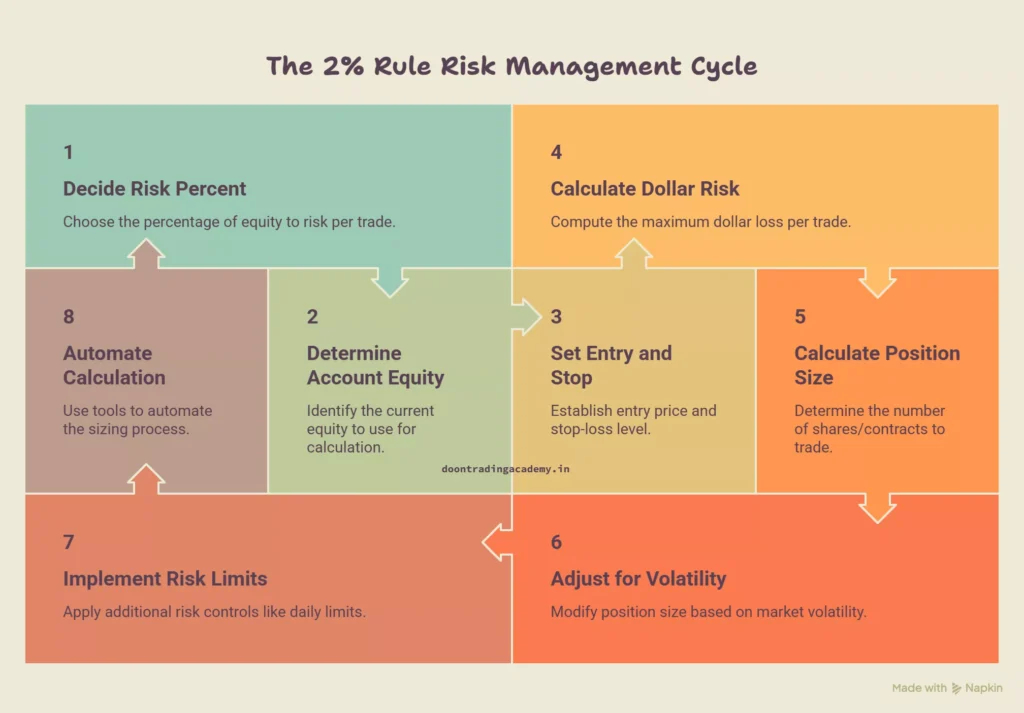
- Decide your risk percent per trade (2% is common; more conservative traders may use 1% or 0.5%).
- Determine account equity to use (total equity or margin-adjusted equity depending on your style).
- Set your entry and stop (use technical levels and, where appropriate, ATR for volatility-based stops).
- Calculate dollar risk and divide by risk per share to get position size.
- Round position size to whole contracts/shares and confirm margin requirements and commissions.
Automation and Tools
Automate the math to eliminate calculation errors and emotional sizing. I use a spreadsheet that links to price feeds and ATR values, and many trading platforms include a position-sizing tool.
For internal references, a short walkthrough on position sizing calculator and a primer on risk management basics will help you build tools faster.
Common Mistakes Traders Make
- Using fixed share counts without adjusting for stop distance.
- Failing to recalculate risk after partial fills or scaling into a position.
- Ignoring commissions and slippage in small accounts where fees materially change effective risk.
- Letting position size creep up after winning streaks—always recalc using current equity.
Advanced Insights (Beyond Common Sense)
- Scaling entries and staggered stops can preserve your original risk cap if you size each tranche so the total at-risk exposure never exceeds 2%.
- Using a risk budget (daily or weekly) prevents a single winning trade from encouraging oversized bets later the same day.
- Combining percent risk with a volatility multiplier (e.g., 2% at 1×ATR vs 2% at 2×ATR) lets you tune aggressiveness to market regime.
- Kelly criterion provides a theoretical optimal fraction but tends to produce sizes larger than prudent—use fractional Kelly (e.g., 0.25–0.5×Kelly) combined with the 2% rule for balance.
- For multi-leg option strategies, convert Greeks (delta) to equivalent shares to apply the 2% rule consistently across instruments.
Trader Voices
On community forums I often see concise reflections that mirror practical realities. For example, one comment by Reddit user u/TraderEcho summed it up: “When I started risking 2% cleanly, the variance dropped and I stopped chasing revenge trades.” Another trader, u/RiskAware, noted: “Automating the calc saved so much time — I stopped resizing positions after wins or losses.”
Troubleshooting



I sometimes encounter issues when implementing the 2% rule; here are solutions I use.
- Problem: Position size rounds to impractical fractional lots. Fix: Use nearest whole contract/share and adjust the stop slightly in the direction that keeps risk under 2%.
- Problem: Commissions and slippage push loss above 2%. Fix: Add estimated fees to the dollar risk before calculating size.
- Problem: Trades with very wide stops yield tiny positions that are impractical. Fix: Reduce percent risk for those trades or avoid them—select higher-probability setups.
- Problem: Multiple simultaneous positions exceed daily risk tolerance. Fix: Implement aggregate exposure limits (e.g., max 6% total open risk) and track . P&L to keep within limits.
If I still get unexpected outcomes, I backtest position-sizing rules on historical data and run a simulator to replicate order fills and slippage. That often surfaces edge cases like rounding, spread widening at entry, or margin calls that I can correct before trading ..
Frequently Asked Questions
- Is 2% always the best choice? It’s a widely used default, but I adapt it to account size, strategy expectancy, and psychological comfort. Smaller accounts may use 1% or 0.5%.
- Should I use fixed stops or ATR stops? I prefer technical stops by default, but use ATR when volatility spikes to avoid being whipsawed by noise.
- How does compounding affect the rule? Recalculate 2% using current equity periodically (daily or after each closed trade) so position sizes scale with your account.
Conclusion
I’ve found the 2% rule to be a practical, discipline-enforcing approach that prevents single-trade disasters while allowing meaningful positions. By calculating position size as (Account Equity × 2%) ÷ Risk per share and adjusting stops for volatility, I keep losses predictable and recovery feasible.
Step-by-step recap: decide your risk percent, measure account equity, set entry and stop (use ATR if needed), compute dollar risk and divide by risk per share to get size, and automate the calculation. I also recommend adding aggregate exposure limits and including fees/slippage in the math.
If you try these steps, tell me how it changes your trading — leave a comment with your questions or experiences and I’ll respond with suggestions based on what worked for me.